This week the class was taught about the growing field of unmanned aerial systems. This developing technology, coupled with geospatial tools can be extremely useful in many situations. Since there are so many different technologies associated with UAVs, the class was exposed to the basics and given a very general overview of how they are used. Although it was an overview, many of the skills learned during the lab are extremely useful when beginning to work with UAV technology.
Study Area:
The study area is on the flood plain of the Chippewa River at the University of Wisconsin Eau Claire's Campus. The floodplain is on the north side of the river under the student walking bridge.
Methods:
The first step in flying a successful UAV mission is to choose the correct type. The two different types discussed as a class were fixed wing and multirotor. These two types have their advantages and disadvantages
The first type discussed was the fixed wing UAV, which is shown below (Figure 1).
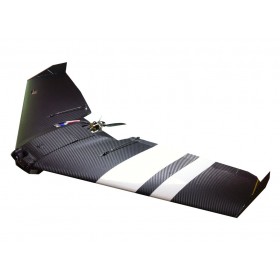 |
| Figure 1. This is a fixed wing UAV. |
One of the biggest advantages of this aircraft is the very simple structure. This simple structure allows it to glide much easier and travel at faster speeds. Typically this aircraft can carry more weight, which could be power sources, thus allowing for longer flights. Although there are many benefits of this type of aircraft, there is also a large disadvantage. This aircraft typically needs a larger area for takeoff and landing. This can cause problems for quick set up missions, unless it is located in a fairly open area.
The second aircraft discussed was multirotor (Figure 2). The aircraft's biggest advantage is just the opposite of a fixed wings disadvantage.
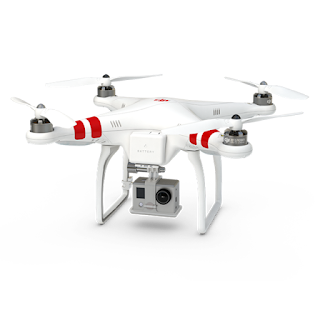 |
| Figure 2. This is a multirotor UAV. This specific model is the DJI Phantom, which was used for a field demonstration for the class. |
This aircraft allows for much easier takeoffs and landings due to its ability to initiate flight vertically. This is a great advantage because it allows the user to takeoff and land in limited space. Although this model can be extremely useful, it is also much more mechanically complex compared to a fixed wing aircraft. This makes for fixes to be much more difficult. This aircraft also does not fly as long or as far as a fixed wing aircraft.
Demonstration Flight:
In order to get an understanding of how UAVs work, Dr. Hupy took the class our for a short mission. (Figure 3).
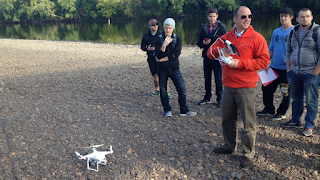 |
| Figure 3. Dr. Hupy explaining the specifics of the UAV used during a class presentation. |
The UAV used was a DJI Phantom and was flown manually (Figure 2). This is a multirotor that worked well for our purpose and study area. On the floodplain there was a large number 24 surrounded by a circle. This figure was made out of larger rocks found on the floodplain, thus having a slightly higher elevation than the surrounding area. With the UAV overhead, multiple pictures were taken of this figure, enough where there would be a large amount of overlap. This overlap was necessary for the processing of the images to take place later on in the lab.
Real Flight Simulator:
Since not every student in class will have a chance to fly an actual UAV, the students used Real Flight Simulator software to give them some flying experience. The software has over 140 different aircraft models for the students to choose from. As was to be expected, the fixed wing aircraft needed much more space to take flight but could travel at much higher speeds. During flight the controls were much more sensitive compared to a multirotor aircraft. Along with sensitive controls, the stability of this aircraft was much lower than that of the multirotor. The multirotor aircraft was much easier to handle and adjust during flight, but could not fly nearly as fast as the fixed wing. Also, as one would expect, the amount of space needed to take off and land was significantly lower than that of a fixed wing aircraft.
Software Utilized:
The first piece of software that can be utilized for a UAV flight is Mission Planner. This software can be used to plan out automated missions. Since the UAV was flown manually for the class, this software was not utilized for our data collection, but it was explained to the class. This software is extremely powerful in helping to plan out a successful mission with the equipment that is on the UAV. Some variables that have a significant impact on a mission are the type of camera sensor being used as well as the altitude of the UAV.
The focal length of the lens on the camera being used is very important to consider before a mission. The focal length of a lens tells you the angle of the lens, or in a simpler sense, how much of area will be captures. Longer focal lengths will have a much narrower image being captured. Although the image is narrower, it gives you a higher resolution image. Shorter focal length lenses are just the opposite, they allow for a much wider image to be captured. There may be more area being captured, but it will not have a good of a resolution.
A second variable to consider is the altitude at which the UAV will be flying. No matter what the focal length of a lens is, the higher a UAV is flying, the more area that will be captured during flight. Although you may be able to catch more area at a higher altitude during flight, it will have an impact on the resolution of the image. The altitude needed for flight would be determined by the goals of the mission.
The camera sensor, or focal length, coupled with the different altitudes that can be flown make up what is know as the field of view or FOV. The field of view is the extent that can be observed at any given time. This concept is extremely important when flying a UAV. Mission Planner takes all of these variables into consideration and helps to generate a flight plan for a given situation (Figure 4).
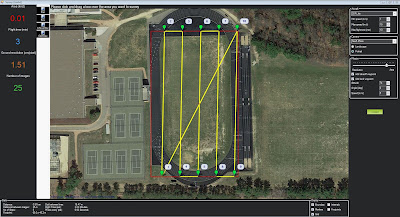 |
| Figure 4. This is a screenshot of Mission Planner software. This is used as a tool to create automated missions for a UAV flight. |
The image above shows the usefulness of the Mission Planner. You can create an area that will be flown and it will automatically generate flight lines and statistics about that mission. The camera and altitude can be changed, which will automatically update the flight lines for the mission. Along with the flight lines, it also gives you the resolution of the images recorded as well as how long the flight will take. The flight time is a crucial piece of information. Since the amount of time the UAV can be in the air is limited, it is important to use that time efficiently.
The second software that was utilized was Pix4D. Not only was this software extremely user friendly, it is extremely valuable at mosaicing large numbers of images together. Knowing that a single flight can generate large numbers of images, this software is extremely helpful. During our class flight, many pictures were taken of a few different features. The feature I worked with was the number 24 surrounded by a circle. The images taken in the field were then imported into Pix4D and mosaiced together (Figure 5).
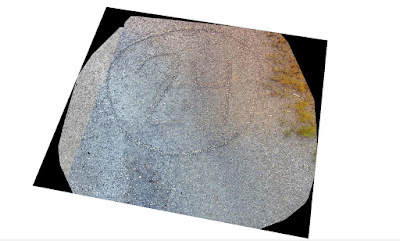 |
| Figure 5. This is the result of Pix4D mosaicing all of the collected images together. |
As shown in the image above, you can clearly see the number 24 surrounded by a circle. If enough images are taken with substantial amount of overlap, a high resolution image can be created through image mosaicing. Although this is a great image, it has greater value when used with geospatial software. This image was then brought into ArcScene in order to produce a digital surface model or DSM. The image below shows the results of bringing the image into ArcScene (Figure 6).
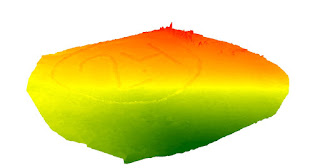 |
| Figure 6. This image shows how the mosaiced image looks in a 3D view. This image was created using ArcScene. |
As shown in the image, the number 24 and circle are raised compared to the surrounding land forms. This is a very simple way of showing the accuracy of the camera on the UAV coupled with geospatial technology. Although this is a very basic example, the same principles could be applied to much more complex situations such as measuring the amount of material being taken out of a particular mine.
Discussion:
In a real life scenario, there is an oil pipeline that is running through the Niger River delta and it has been showing signs of leaking. Not only is the pipeline losing oil, it is affecting agriculture in close proximity to the pipeline. The company would like the assistance of a UAV in locating these areas with a possible pipeline leak.
Although the specifics related to the length of the pipeline were not provided, I will assume for the purpose of the scenario that it is a fairly long pipeline. After assessing all the needs of the client, I would recommend a fixed wing aircraft that has a high quality camera equipped with a near infrared sensor.The UAV that I would recommend is the QuestUAV Q-200 AGRI Pro Package (Figure 7).
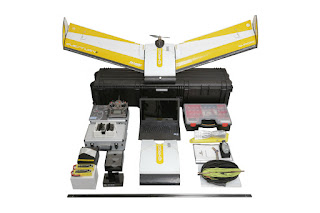 |
| Figure 7. This image shows all of the things included with the QuestUAV Q-200 AGRI Pro Package. |
The basic package for this UAV is priced around $28,000. It has a flight time of roughly 50 minutes and can cover up to 2,400 acres in that time (questuav.com). This package comes with two NDVI sensors as well as Pix4D that can be used for post processing of images collected. The near infrared sensors can detect the chlorophyll levels in the agricultural fields surrounding the pipeline. The lower the chlorophyll levels, the lower the quality of plant health. If these lower levels of chlorophyll are located near the pipeline, there may be a greater chance this is where a leak is occurring.
Not only does this package come with sensors that will help find damaged agriculture, it also comes with mission planning software. This software will allow for flights to be planned around suspected areas of a leaking pipe. This UAV can help to find the currently leaking pipes, but will also help to locate a new leak before it becomes a larger problem.
Conclusion:
Overall this exercise was extremely useful. It provided great insight into the growing field of UAV technology. The uses for a UAV are continually growing. Although we were not able to use all the the different technologies associated with UAVs, we were exposed to many of them and have a better understanding of how useful it can be when coupled geospatial technologies.
Sources:
http://www.questuav.com/store/uav-packages/q-200-agri-pro-package/
No comments:
Post a Comment